Office Users How-To: Getting Started
In this article:
Logging In (Receiving Your Invite)
Your Timesheet and Timesheet Entries
How to Use Your Agenda Screens
How to Use Your Activity Screens
My Device and Jobman
Jobman is a web browser based software product, so you can use it on your computer, phone, or tablet, using any operating system and any browser. Please note, however, that if your device and browser are not fully up-to-date, you may be unable to access all or parts of your Jobman software.
The quality and speed of your internet connection will also greatly impact the running of your software.
Logging In (Receiving Your Invite)
To log in to Jobman for the first time, you will first need to receive an email from your manager with an invitation to log in.
The email will look something like this:

Click Accept Invitation.
You will be redirected to a login page that looks like this:

Please Note: The email that appears under "Email Address" above will become your user login email for when you log in to Jobman. You MUST check that this is correct before proceeding.
Your user login email is not necessarily the same as your staff email - in fact, your user login email will often be your personal email, whereas you may be assigned a generic staff email, e.g. "sales@yourbusiness.com".
Enter a password and click Sign In.
The password entered will become your user login password for when you log in to Jobman.
Once you have signed in, you will be redirected to Jobman Identity.
Jobman Identity vs Jobman App
When you sign into Jobman for the first time, you will see a screen that looks like this:

Click Join [Your Organisation Name].
If your name and/or email are incorrect - particularly if the email listed is not your user login email, click Sign in with a different account and try again.
You will now be shown a page that looks like this:

This page is part of the Jobman Identity portal. Check the URL at the top of the screen and note that it begins with identity.jobmanapp:

Jobman Identity is where users log into Jobman before accessing their specific organisation's site (also called the Jobman App).
This is because some Jobman users can belong to multiple organisations that use Jobman.
You will need to log in to Jobman Identity each day when logging onto Jobman for the first time.
We recommend bookmarking the Jobman Identity login page so you can easily access it. You can look up how to do this on your browser and device, e.g. googling "How to bookmark pages in Chrome.
If your user login details (email and password) have been linked to multiple staff profiles across different organisations, you will see a list of the organisations you have access to when you log into Jobman Identity, as shown in the screenshots above.
In most cases, however, you will only see one organisation listed in Jobman Identity > Organisations.
To access your organisation's site and enter the Jobman App, click the orange Open button next to your organisation:

You will be redirected to your Dashboard in your organisation's site:

Note that the URL now begins with jobmanapp.
What if I can’t see my organisation?
- Make sure you’re logged in to the correct account.
- Try logging out and logging back in.
- Clear your browser cache/cookies.
Please Note: If you ever lose the URL to log in to Jobman, you can always go to our website, jobman.com, and click Log In at the top right:

Staff Roles and Permissions
Your administrator (usually the business owner or manager) will have set up your staff profile in your organisation's Jobman site. Your staff profile is connected to your user login details.
Depending on your position in the organisation, your administrator will have given you one or more staff roles, e.g. "Accounts", "Sales", "Production Manager", etc. These are defined by and unique to your organisation.
Each staff role has a set of permissions enabled, which determines what users with that role are allowed to see and do inside Jobman.
If you are unable to see something or perform an action in Jobman, please check with your administrator whether you have the necessary staff role permissions to do so.
My Jobman
Once inside the Jobman App, you can click on your organisation name at the top right to access any of your other organisations, or click My Jobman to return to Jobman Identity:
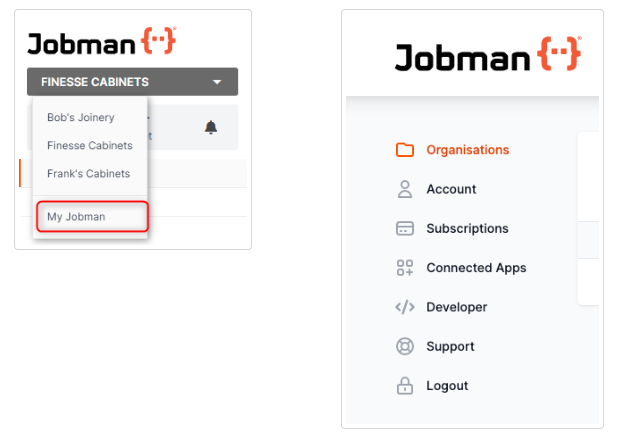
Select Account to update any of the following:
- Personal Details
- Email Address
- Language Settings
- Date Format
- Timezone
- Your Password
Select Organisations to see a list of organisations you are linked to. Click on one of these to open Jobman for that organisation.
Select Support to access our help documentation. If you can’t find the information you need, you can lodge a support ticket.
Select Logout to log out of Jobman Identity.
General Navigation
Your Staff Profile and User Menu Panel
To access your staff profile, simply click on your name in the User Menu Panel on the left (see below). Here you can view or update your details and password, view your timesheet, notifications, and tasks.
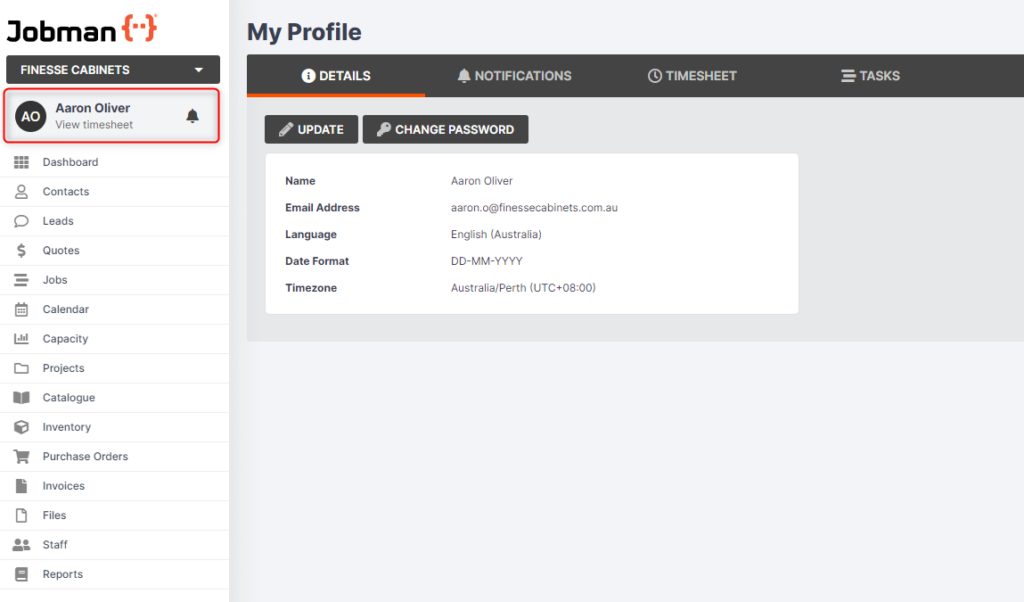
The User Menu Panel is the main navigation tool for the software.
Please Note: depending on your staff role permissions, you may not be able to see all options on your User Menu Panel.
Dashboard
If you have been added to any activity screens or agenda screens, these will appear in your Dashboard. Click into an activity or agenda screen to see further information.
At the bottom of the Dashboard you will also see your Recent Tasks, which shows tasks you have previously completed.

Kiosk
Kiosk mode can be used if you are out on the floor or the road, so you can easily log time against tasks from your tablet, phone, or laptop!
Settings
Settings are only available to users who have the necessary permissions. Use Settings to configure your Jobman software to suit the needs of your business.
Navigation Tips & Tricks
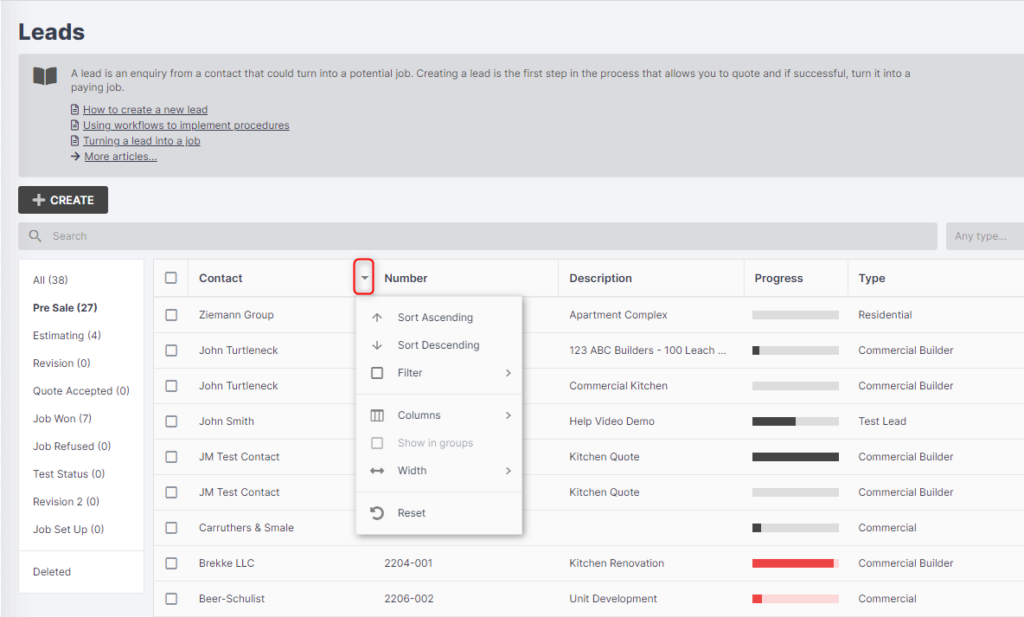
Customise Your Column Displays
Information in Jobman is often displayed in tables, or grids. There are many options available to customise your column displays in these grids, including sorting by ascending/descending order, adjusting column widths, dragging & dropping to move columns, and showing/hiding individual columns.
Drag & Drop to Sort
Some grids will have a column called Sort, with the list icon appearing against each item in the grid. This means you can drag & drop rows in the grid to display in your desired order.

Manage Pop-Ups
Some windows in Jobman require pop-up blockers to be disabled. The help menu is one that many are not aware of due to pop-up blockers, preventing full usage of Jobman software. Please do a search on how to prevent certain sites from being blocked, or click on a link below.
Multi Select & Bulk Updating
Many tabs in Jobman will have a multi select menu on the left, enabling you to select and de-select combinations to filter what you can see on the screen.
You can also select multiple items on screen using the checkboxes (see below) and then click With Selected (top-right) to perform an action on multiple items at once.

Show/Hide Work Orders from your Jobs tab
Choose what you see: tick this box to hide all work orders from your Jobs tab.

Activity Updates & Notes
See all recent activity within leads, jobs, tasks, purchase orders, invoices, etc., by scrolling down to the Activity & Notes section. Here you can also add notes!
Help
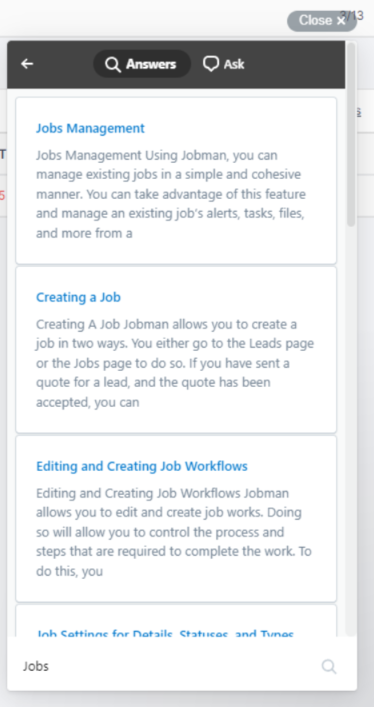
Not sure what to do? We’re here to help. You can access our help tools by clicking Help on the User Menu Panel.
Here you’ll find help documentation, video tutorials, and access to our support line if the documentation doesn’t answer your question.
Simply type in some keywords for what you need to learn about (for example, “how to create a job,“) and read through the help topics. You can read this in the app, or open in a new tab.
Notifications
At the top-left of your screen next to your profile name, you'll see the notification icon, which will have an orange number next to it if you have one or more unread notifications:

Click on the notification icon to be redirected to your notifications tab:

- You can also access this by clicking into your staff profile and clicking on the tab directly.
- You can use the Mark All As Read button to mark all unread notifications as "read".
- Or, you can use the tick boxes to select one or more notifications, and then click With Selected > Mark As Read.
-
Use the Unread / Read drop-down to filter your notifications:


When all your notifications are marked "read", the tab will be cleared, if you are filtering for unread notifications:

You can still access your historical notifications by filtering for read notifications.
Notifications are used to draw your attention to important events, e.g. "You have been assigned to a task," or "Damaged part - Job #0075", so make sure to check your notifications throughout the day!
Notifications will often contain hyperlinked information. In the example below, clicking on the hyperlinked job number will redirect you to that job:

Your Timesheet and Timesheet Entries
At the top-left of your screen underneath your profile name, you can click View timesheet to be redirected to your timesheet tab:


- You can also access this by clicking into your staff profile and clicking on the tab directly.
-
The date range you are looking at will be displayed at the top-right of the timesheet:

-
Use the List/Day/Week/Month buttons to toggle the display:

-
Use the arrow buttons to go forwards/backwards from day to day, or week to week, or month to month:

-
Use the Today button to return to the present day/week/month:

- Use the refresh icon to reload the timesheet and see any new entries:


Creating a Timesheet Entry
To create a new timesheet entry, you can either click Create at the top-left of your timesheet, or you can click directly on the relevant day/time anywhere in your timesheet.
A window will open that looks like this:

- Choose your item: Job, Lead or Project.
-
Select which Job/Lead/Project and which Task to allocate your time against:

- Enter the start and finish times for the task.
- Add a description if required.
- Click Create.

Once you have created a timesheet entry, you can:
- Click and drag it up or down to change the start time.
- Click the bottom of the entry and drag up or down to change the end time.
-
Click on it to open a pop-up summary:

In the summary you can click Update to change any of the entry details, or click Copy to duplicate the entry to another day/time in your timesheet (and edit any other details as needed), or click Delete to remove the entry from your timesheet.

Tasks
If you click into your staff profile, you can click on the Tasks tab to view your pending and completed tasks:

Click on Pending or Completed to toggle which tab you are viewing. Pending shows tasks that have been assigned to you which need to be completed, and Completed shows all the tasks you have finished.
When viewing pending tasks, you can:
-
Click on a task to view a summary:
-
Click the three-dot menu next to a task to quickly Start, Set Progress, Complete, or Mark as N/A:


Task Actions
When you have opened a task summary or used the three-dot menu next to a task in your Pending tab, you can perform various task actions (depending on your staff role permissions):
-
Start: Click to begin recording time against a task.
When you click Start from either the three-dot menu or the task summary, you will see the below dialogue asking you to confirm. You can tick the box to prevent this dialogue from appearing in future.

-
Pause (only appears if you have clicked Start): Click to stop recording time against a task, if you are planning on starting the task again before the end of the day.
When you are actively recording time against a task, you will see the sand timer icon next to it in your pending tasks and agenda screens. You will also see the progress bar filling in:

You will also see the Pause and Stop buttons appear in the task summary and the three-dot menu:


When you click Pause, you will see the below dialogue appear. Click and drag the progress marker if needed to show an estimate of how close the task is to completion, then click Pause again.

-
Stop (only appears if you have clicked Start): Click to stop recording time against a task. Only click Stop if you will not be returning to the task before the end of the day.
When you click Stop, you will see the below dialogue appear. Click and drag the progress marker if needed to show an estimate of how close the task is to completion, then click Stop again.

-
Set Progress: Click to provide a visual indicator of where you are up to with the task. Click and drag the progress marker to the desired percentage, then Save Changes:

Tip: If you have incorrectly marked a task complete, you can set the progress back to 0% to "un-complete" it.
-
Mark as Completed: Click when you have finished the task. It will be removed from your pending tasks and agenda screens.
When you click Complete from either the three-dot menu or the task summary, you will see the below dialogue asking you to confirm. You can tick the box to prevent this dialogue from appearing in future.

-
Mark as N/A: Click if the task is not required for this lead/job/project. It will be removed from your pending tasks and agenda screens.
When you click N/A from either the three-dot menu or the task summary, you will see the below dialogue asking you to confirm. You can tick the box to prevent this dialogue from appearing in future.

-
Files: Click to view and upload files, photos, etc. that are associated with this task.
When you click Files from the task summary, you will see the below window. Click into a folder to view any uploaded files, or click New Folder or Upload to add a folder or file. Any changes you make here will be reflected in your cloud file storage.

-
Update: Click to change any of the task details.
When you click Update from the task summary, you will see the below window. Make any changes needed, then click Save Changes:

-
Set Start Date: Click to set a date for when the task must begin. Once you have set a start date, the task will appear in your target calendar.
When you click Set Start Date from the task summary, you will see the below window.

- Type a new date or click the calendar icon to select.
- Use the Recalculate Dates drop-down to select an option: all tasks, all tasks before this one, all tasks after this one, or do not recalculate. This will set corresponding dates for the other tasks in your workflow, depending on the option selected.
- Tick Ignore capacity constraints if you want to schedule your task(s) for the nearest available calendar day(s), regardless of other tasks scheduled on those days.
- Click Save Changes when finished.
-
Set Target Date: Click to set a date for when the task must be completed by. Once you have set a target date, the task will appear in your target calendar.
When you click Set Target Date from the task summary, you will see the below window. The steps for setting a target date are the same as for setting a start date (see above).


Please Note: It is not required or recommended to set start and target dates for tasks, only one or the other, depending on your organisation's needs.
- Set start dates if you want your tasks to begin during a certain timeframe; OR
- Set target dates if you want your tasks to be completed during a certain timeframe.
-
Set Labour Centre: Click to set which labour centre the task should be allocated against. This will show in your capacity planner and target calendar.
When you click Set Labour Centre from the task summary, you will see the below window. Use the drop-down to select a labour centre, then Save Changes:

-
Lock Target Date: Click to prevent the task's target date from being changed. You can Unlock it afterwards if needed:
When you click Lock Target Date from the task summary, you will see the below dialogue asking you to confirm. Click Lock again.

Once a target date has been locked, you will see the Unlock option appear:

Only users with the necessary permissions can lock or unlock target dates.
-
Members: Click to add or delete members assigned to the task. Members are in charge of completing a task, and will see it in their pending tasks and agenda screens.
When you click Members from the task summary, you will see the below window. Type a name or use the drop-down to select and add a new member, or click the three-dot menu next to an existing member to delete them.

-
Delete: Click to delete the task. It will be removed from your pending tasks and agenda screens.
When you click Delete from the task summary, you will see the below dialogue asking you to confirm. Click Delete again to confirm.


How to Use Your Agenda Screens
From your Dashboard, you can view any agenda screens you have been added to:

Your agenda screen is similar to the tasks tab in your staff profile (see Tasks), but it can be shared between you and other staff members, and you may be able to view tasks that are assigned to other staff members.

The benefit of using your agenda screen is that it gives you a "to-do" list of all your tasks, arranged in priority order and by due date, but also gives you a clear idea of where the whole team is up to.
Your agenda screen tasks are generally listed by target date, with the tasks at the top of the list needing to be completed first.
If your manager has chosen to set priority levels for specific leads/jobs/projects, the tasks with the highest priority will appear at the top.
In your agenda screen you can:
- Customise your column display (see Navigation Tips & Tricks)
- View pending and completed tasks - the same as in your tasks tab
-
Use the three-dot menu next to a task to Start, Pause, Stop, Set Progress, Complete, or Mark as N/A (see above)

- Click on a task to view the task summary and complete any task actions (see Tasks)
-
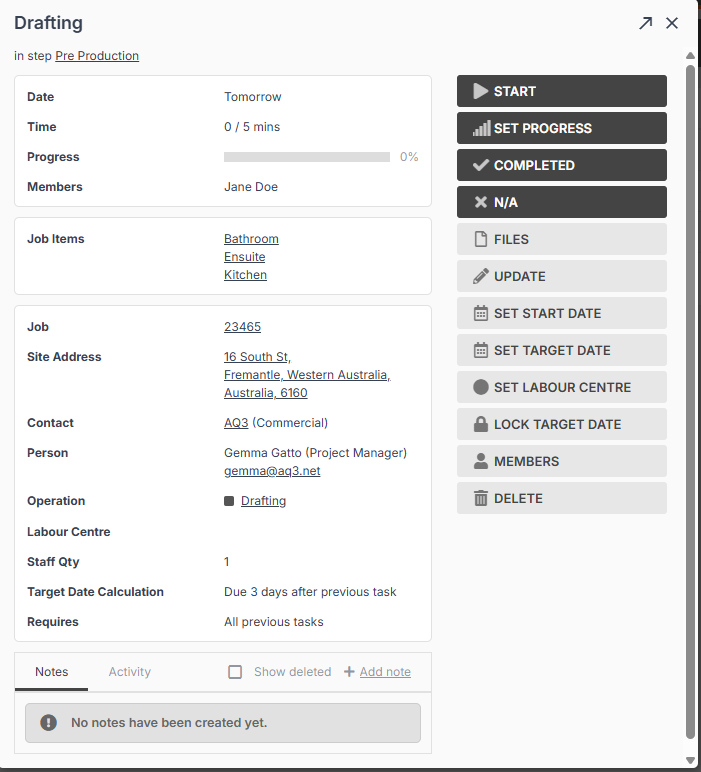
Click on any of the hyperlinks in the task summary to be redirected to the relevant part of the software:

- Click on any lead/job item to open a pop-up window with a summary of the item specifications;
- Click on the lead/job number to be redirected to that lead or job;
- Click on the site address to view it in Google Maps in a new tab;
- Click on the contact name to be redirected to that contact;
- Click on the operation to be redirected to the operation settings;
- Click on the labour centre to be redirected to the labour centre settings.


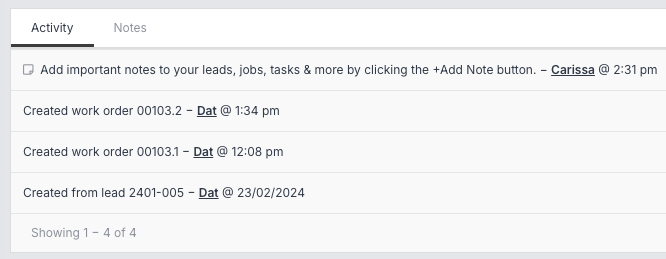
Notes and Activity
At the bottom of the task summary, you can click Notes or Activity to view more information associated with the task.
Activity logs information about the task automatically, to help track who does what in Jobman.
Example:

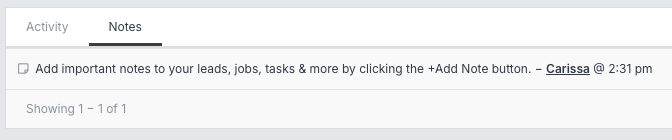
Notes allows you and other staff to add extra information about the task manually.
Example:

If you have the necessary staff permissions, you can:
- View notes left by you or other staff.
-
Click Add Note to leave a note. Type your message, then click Create.

-
Click the three-dot menu to Edit or Delete notes left by you and/or other staff:

- Tick Show deleted to view any deleted notes.


Tip: The Notes field in a task summary is for notes specific to the task itself. You can also add more general notes to leads, jobs, and more!
To learn how to create an agenda screen, click here.
How to Use Your Activity Screens
From your Dashboard, you can view any activity screens you have been added to:

Activity screens give you an overview of staff members' daily activity as they log time against tasks. Your organisation may have multiple activity screens for different teams or departments.

In your activity screen you can:
-
See how many staff are active today:

-
If you have staff in different time zones, they will be grouped under time zone headings for easy reference:

-
Select which date you want to view staff activity for (this is useful when you are checking timesheets at the end of the pay run):

- Click the calendar icon to select a date
- Click the forward/back arrows to switch to the next or previous day
- Click Today to return to the current date
-
View total time recorded for each staff member:

-
Hover over an entry to view a quick summary of the task a staff member has worked on, or click into it for full details:

- Tasks appear in red if they have gone over time.
- Non-productive time (where a staff member is clocked on but not logging time against a specific task) appears in light grey.
-
Activity screens will also show what time staff have clocked on and off, and will show the most recent task a staff member has worked on:

-
Click on a timeline entry to see a pop-up summary of the task. Clicking on the lead/job hyperlink will redirect you to that lead or job. Clicking on the task hyperlink will open the task summary where you can perform related task actions (see Tasks):


To learn how to create an activity screen, click here.
To learn how to display an activity screen, click here.