Using Kiosk Mode - General
In this article:
Kiosk Mode Link
When your employer has set you up as a Kiosk User in their Jobman Software, they will email you a link that looks something like this:

When you click the link, you will be taken to this page:

We strongly recommend saving the URL to your work device home screen for easy access in the future. (You can look up how to do this, e.g. "How to save link to home screen on iPhone using Chrome".)
Once you have saved the URL to your home screen, select your name from the drop-down:

Then, using the keypad (shown above), enter the temporary PIN which you have received in the email. You will be redirected to the following screen:

Using the keypad as before, set a new PIN.
Important: Once you have set your new PIN, do not share it with anyone. Your PIN can be changed at any time, or revoked by your manager if necessary.
Once you have typed in your new PIN, you will be redirected to the Kiosk Dashboard, which will look something like this:

Note: Not all of these icons may appear on your Dashboard. The icons you can see will depend on which staff permissions you have been given.
Clocking On and Off
Use the Kiosk clock on/clock off function to record your time and attendance at work.
To clock on and off, follow these steps:
- Navigate to Jobman Kiosk from your device home page and enter your PIN to log in.
-
From the dashboard, press Clock On:

-
You should now see that the Clock On button has changed to Clock Off:

- When you are finished recording time for the day, press Clock Off (above).
-
Select Clock Off (below):

You should now see the Clock Off button has changed back to Clock On.
You can clock on and off multiple times in one day. However, this is not recommended.
Recording Break Times
IMPORTANT:
If your organisation has standard unpaid break times, e.g. lunch from 12:30-1pm, this will already be set in your Jobman software by your manager. You do not need to clock off during this time.
However, if you need to take an unpaid break outside your scheduled time (e.g. you want to have lunch at 1:15-1:45pm), follow the steps below.
Paid breaks (e.g. morning tea and afternoon tea) do not need to be recorded.
To manually record an unpaid break, follow these steps:
-
From the Dashboard, press Clock Off:

-
Select Start Break:

-
Select your break from the drop-down, then press Start Break again:

IMPORTANT:
-
You cannot manually record the same unpaid break more than once per day, even if you clock off and on again.
Example: The normal lunchtime set by your manager is 12:30, and you manually record a lunch break at 1:15. Jobman will automatically record you as clocked on during the normal lunchtime. However, if you have the option to record a lunch break and an evening meal (if you are working late), you can record both of these in one day.
- You cannot record a break retroactively. If you press Start Break, your break time will start immediately. You cannot get to the end of the day and then record that you took a break at a specific time some hours earlier.
Dashboard
What do I See On My Dashboard?
The icons you can see on your Kiosk Dashboard will vary depending on your staff permissions.

Clicking on any of these icons will take you to the relevant tab inside the Kiosk. We will cover each of these in more detail later.
Agenda Screens: Your Number One Focus!
Beneath your icons, you will see one or more agenda screens, depending on how many your manager has made you a member of:

Your agenda screen is a to-do list of all the tasks needing to be completed by you, and any other members assigned to that screen. Your agenda screens should be your number one focus when using Jobman. Always check your agenda screen to see which task you need to complete next!
Notifications
At the top-right of your screen, you can see the notification icon, which will have an orange number next to it if you have one or more unread notifications:

Click on the notification icon to read your notifications:


You can use the Mark All As Read button to mark all unread notifications as "read". Or, you can use the tick boxes to select one or more notifications, and then click With Selected > Mark As Read:

When all your notifications are marked "read", the orange and red dots will disappear from your screen:

Notifications are used to draw your attention to important events, e.g. "You have been assigned to a task," or "Damaged part - Job #0075", so make sure to check your notifications throughout the day!
What Do the Icons at the Top-Right Mean?
|
|
Profile Icon: Click here to view your profile |
|
|
Home Icon: Click here to return to the Dashboard |
|
|
Notification Icon: Click here to view your notifications |
|
|
Help Icon Click here to access in-app help |
|
|
Log Out Icon: Click here to return to the Kiosk login screen |


Returning to the Dashboard
You can return to your Kiosk Dashboard at any time by clicking the Home Icon (see above), or by clicking Dashboard in the navigation links at the top-left of the screen:

Using Your Agenda Screen
As mentioned above, your agenda screen is the most important part of the Kiosk. You will spend most of your time in Jobman operating from the agenda screen, identifying tasks you need to complete, and logging time against those tasks.
Here are some guidelines for how to use your agenda screen.
User Column Control
Hover over any existing column heading, then click on the arrow icon:

If you click on Columns, you will see a second menu which shows all the possible columns which you can show/hide:

- Select the columns you wish to show, and deselect the columns you wish to hide.
- Your preferences will be saved when you return to this part of the software.
If you click on Width, you will see a second menu which shows all the possible settings to adjust your column widths:

- The normal setting for column widths is Fixed, which means the column is set to a 'fixed' width, so if you have only a couple of columns visible, all the content will appear to the left of the grid, but if you have a lot of columns visible, you may have to scroll to the right to see the content:


- When you choose Flex All, it will attempt to fill the space by adjusting the width of the columns equally. No matter how much they adjust, the width of column 1 is the same as column 2.


This is handy because it reduces the need to constantly resize things to make them fit.
- If you want different columns to be different widths, you can use Flex 2, 3, 4, or 5. (Read More)
- You can also click and drag any of the lines that separate column headings to expand or narrow an individual column width.
To reposition any of the columns in your display, simply drag-and-drop them as desired.
Example: to move the Number column to the left of the Description column, click on the Number column heading and drag.
The small box with the green tick indicates that you have selected the Number column.
The green arrows to the left of the Description column header indicate where the Number column will be placed once you release your cursor.

Priority Levels: Your Order of Operations
Agenda screens are arranged so that you should complete the task at the top of the list first.
The tasks on your agenda screen will generally be sorted by target date, meaning that the tasks which need to be completed first will be at the top.
However, your manager might assign priority levels to certain jobs, which means that the tasks for those jobs will be moved nearer to the top of your agenda screen.
Example:

The tasks at the top have been marked 1 - Critical and are coloured red. These are the most important tasks to complete.
The tasks at the bottom have been marked 5 - Low and are coloured grey. Only complete these tasks after you have completed all the others.
Members
Sometimes the tasks in an agenda screen will be assigned to different people - meaning that you will not need to complete all agenda screen tasks by yourself.
Members are used to show which tasks have been assigned to which people.
The members column in your agenda screen will show a person's initials next to a task if that person has been assigned to complete that task. This will help you quickly determine whether it is your responsibility to complete the task, or another person's in the team.

If the task has no members assigned to it (e.g. the members column is blank for this task), then the task can be completed by anyone.
Logging on to Your Tasks
Once you are ready to start your task, click on it inside the agenda screen:

A new window will pop up that looks like this:

Press Start to begin logging time against the task.
A pop-up will appear asking you to confirm. Press Start Task:

Once you have started the task, you will see a sand timer icon next to the task time, indicating that you are currently logging time against this task:

Press Pause if you need to take a temporary break from the task (e.g. for lunch time or to begin a different task).
A pop-up will indicate how much progress you have made against the estimated task time. You can click and drag to adjust the progress bar to reflect how close the task actually is to being finished.
Press Pause again to confirm.

When you are ready to come back to the task, click into it again from your agenda screen and press Resume:

A pop-up will appear and ask you to confirm. Press Resume again:

Press Stop only if you are finishing work for the day.
A pop-up will appear and ask you to confirm. Press Stop again:

Press Completed when you have finished the task.
A pop-up will appear and ask you to confirm. Press Mark as Completed:

Once the task has been marked completed, it will be moved from the Pending Tab to the Completed Tab in your agenda screen:

Files
When you click into a task from your agenda screen, you can click on Files to view or upload files related to this task (e.g. drawings, photos, etc.)

Creating an Alert
If something goes wrong during your task and you need to notify a supervisor (for example, a material is damaged), you can click Create Alert.

Choose the appropriate Alert Type from the drop-down (please note, these will be different for each organisation):

Then type a message and attach files/photos if needed, and click Create.
Tip: If you click Upload, Jobman will open your camera app so you can easily take and upload photos.

This will send a notification to the relevant staff members.
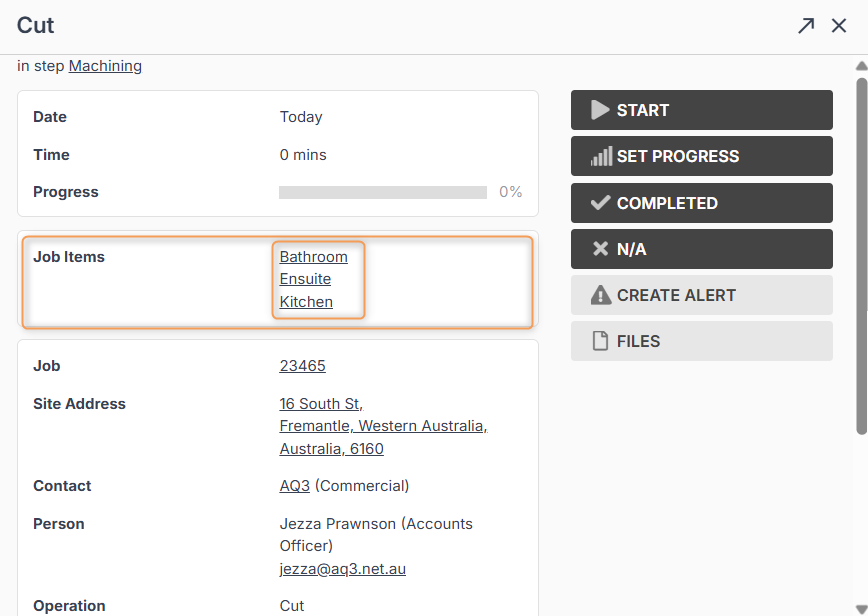
Item Specifications
When you click into a task from your agenda screen, you can click on any of the Job Items to see the item specifications:

Site Address - Google Maps Link
When you click into a task from your agenda screen, you can click on the Site Address to open a new window which will show the site on Google Maps:


Adding Job Task Notes
When you click into a task from your agenda screen, you can click Add Note to leave a message for the whole team to see:

Type your message as needed and click Create:

Your note will now be visible in the Notes field. If you have the necessary staff permissions, you can click the three-dot menu next to your note to Edit or Delete it.

Jobs Tab
From the Kiosk Dashboard, press Jobs to go to the Jobs Tab:

The Jobs Tab looks like this:

- Use the Search bar to look for a specific job number.
- Use the Type and Status drop-downs to filter your jobs for any combination of job types/statuses.
- As with your agenda screens, you can control how the columns in the Jobs Tab are displayed. (See previous section.)
- Click on a job to see more information:

Printing Labels
If you have materials in your factory or warehouse belonging to a job and you need to print a label for them, find that job in the Kiosk by navigating to the Jobs Tab, searching for the job number, and clicking into the job as shown above.
Press Label:

Select the quantity of labels to print, then click Create:

Select your label printer from the print settings menu, then click Print:

Tip: The template for Kiosk labels can be edited in Settings > Templates by an office user with the relevant staff permissions.
Using the Picking List
When you have taken materials from your factory or warehouse to allocate to a job, find that job in the Kiosk by navigating to the Jobs Tab, searching for the job number, and clicking into the job.
Press Picking List:

Select your materials from the list and click Remove from Inventory:

Filling Out Forms
When you click into a job from the Jobs Tab, you can fill in any forms related to that job (e.g. site inspection reports, safety hazard checks) by pressing Forms:

Click into your form from the list:

Click Update to fill in your form:

(Note: Some forms are view-only in the Kiosk. If a form is view-only, you will not be able to see an Update button.)
Type in your answers and click Save Changes:

Your answers will now show on the form, and it will be marked Complete.
You can also click PDF to export the form to PDF for printing:

Completed forms will show the name of the person who completed them, and the time at which they were completed:

Checking and Creating Job Notes
When you click into a job from the Jobs Tab, you can view any job notes at the bottom of the screen:

Click Add Note to type a new note, or click the three-dot menu next to a note to Edit or Delete it. (You can only do this if you have the relevant staff permissions.)

Alerts, Files, and Tasks
When you click into a job from the Jobs Tab, you can click the Alerts, Files, or Tasks buttons to view, create, and update any of these.

Please see previous sections for more information on job alerts, files, and tasks.
Tasks Tab
From the Kiosk Dashboard, press Tasks to go to the Tasks Tab:

The Tasks Tab looks like this:

As with agenda screens, you can control how the columns in the Tasks Tab are displayed. (See previous section.)
Pending shows you a list of tasks you have been assigned to complete.
You can click on a task to open a pop-up with its information, or click the three-dot menu next to a task to start it, set progress, create an alert, etc. (See previous section.)

If you click on Completed, this will show you all the tasks that were assigned to you and have been completed.

Using Progress Accurately
If you have paused or stopped work on a task, especially if the task is likely to go over several days, make sure to click into the task and use Set Progress to show an accurate representation of where the task is up to.

Simply click and drag the progress bar and click Save Changes:

This will then show in the Tasks Tab so the whole team can get an accurate idea of where the job is up to.

Purchase Orders Tab
From the Kiosk Dashboard, press Purchase Orders to go to the Purchase Orders Tab:

The Purchase Orders Tab looks like this:

- Use the Search bar to look for a specific PO number.
- Use the Status drop-down to filter your POs for any combination of statuses.
- As with your agenda screens, you can control how the columns in the Purchase Orders Tab are displayed. (See previous section.)
- Click on a PO to see more information:

Receiving PO Items
When goods arrive at your factory/warehouse, you will need to mark them as received in Jobman.
If a PO is in the Ordered or Partially Received status, you can click into it to receive some or all of the PO items.
Click Receive / Unreceive:

Use the tick boxes or type in the quantity cells to receive the correct number of items, then click Receive:

If you have received all items on a PO, the status will update to Fully Received. If you have only received some of the items, the status will update to Partially Received.
Unreceiving PO Items
If you have mistakenly received items on a PO, you can easily undo this by clicking into the PO and pressing Receive / Unreceive:

Use the tick boxes or type in the quantity cells to unreceive the correct number of items, then click Unreceive:

The PO status will then update to Partially Received.