JMSync - Cabinet Vision Integration
Please Note: CAD/CAM integration is an optional extra and must be purchased separately. To purchase this integration, see Updating your Subscription.
| Supported Versions | JMSync Version |
| Cabinet Vision 2022 | 1.0.2 or later |
| Cabinet Visiob 2023 | 1.0.2 or later |
| Cabinet Vision 2024 | 1.0.4 or later |
| Cabinet Vision 2025 | 1.0.4 or later |
| Cabinet Vision 2026 | 1.0.4 or later |
In this article:
JMSync Set Up:
If You Are Using Cabinet Vision 2024-2026 (requires JMSync 1.0.4 or later)
If You Are Using Cabinet Vision 2023 or Earlier
Creating a Test Job with CV and JMSync
Troubleshooting and Advanced Set Up
What is JMSync?
JMSync is an app created by Jobman to facilitate data transfer between Cabinet Vision and Jobman.
Cabinet Vision Integration
Linking Jobman to Cabinet Vision will:
- Reduce double-handling of data
- Minimise human error
- Minimise time wasted
- Speed up processes
- Highlight other inefficiencies
JMSync
JMSync is a stand-alone application designed to run locally for Cabinet Vision users. JMSync can send information from Cabinet Vision’s report database, converting to a smaller file size that is suitable for uploading to Jobman.
Installing JMSync
Setting up Cabinet Vision with your product codes is easier with JMSync Installation.
If you don't have this program yet, please install JMSync 1.0.4.
- Download, then extract this zip file.
- Run the installer. (This will install the program and open JMSync.)
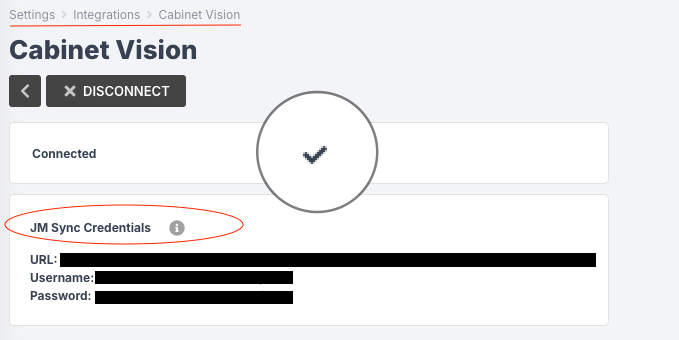
- In Jobman, navigate to Settings > Integrations. (Note: This must be done by a Jobman Administrator.)
- Select Cabinet Vision, then click Connect to Cabinet Vision.
- You will see your login credentials displayed on the screen:
- In JMSync, go to Settings > Upload.
- Enter the details shown on the Cabinet Vision screen in Jobman:
-
You should now see in Jobman that you are connected:

JMSync Set Up
If You Are Using Cabinet Vision 2024-2026
-
In JMSync, navigate to Reports:
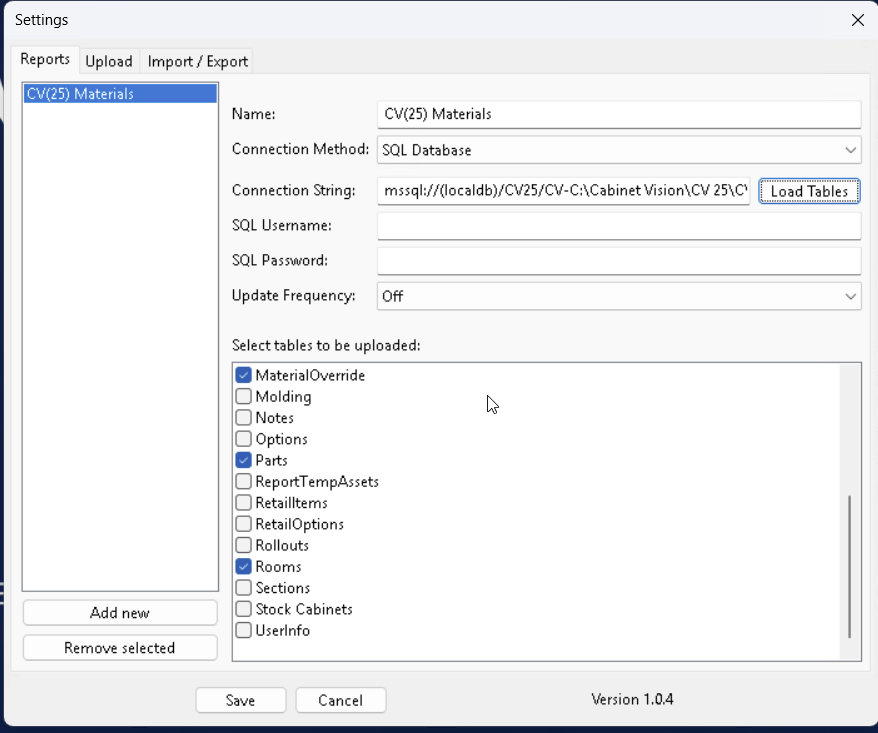
- Click Add New.
- Name: CV(Version Number) Materials
- Connection Method: SQL Database
- Copy the following connection string: mssql://(localdb)/CV25/CV-
- Paste into the Connection String field (see image above)
- Locate your Report.mdf file on your computer. This is typically located in C:\ProgramData\Hexagon\CABINET VISION\CV 2025\Database\report.mdf

Note, this connection string may need to be adjusted for your local environment. You may have to load Microsoft SQL Server Management Studio to find the correct path to the report.mdf file for your environment.
-
Copy and paste the report location string (from step 7) into the Connection String field after "mssql://(localdb)/CV25/CV-"
Your connection string should now look something like this:
mssql://(localdb)/CV25/CV-C:\ProgramData\Hexagon\CABINET VISION\CV 2025\Database\report.mdf
It could also look like this:
mssql://(localdb)/CV25/CV-C:\Cabinet Vision\CV 2025\Database\report.mdf
- Leave the SQL Username and SQL Password fields blank.
- Leave Update Frequency off
- Click Load Tables. You will need to select the following as a minimum:
- Accessories
- Cabinets
- CXMaterials2
- CxMaterialVendor
- CxPart2
- Job Info
- Parts
- Rooms
If you are missing any of these tables, see Troubleshooting.
- Click Save.
If You Are Using Cabinet Vision 2023 or Earlier
- In JMSync, navigate to Reports:
- Click Add New.
- Name: CV(Version Number) Materials
- Connection Method: Local File
-
Locate your Report Database:
(For local installations): C:\Cabinet Vision\Solid_(CV Version Number\Database\Report.accdb
(For network installations): <server name or mapped network drive letter>/cabinetvision (or planit)/users/<user profile>/Report.accdb
- Note: If you are using CV 2022 or earlier, you will need a Report.mdb file, not Report.accdb.
- Click Load Tables. You will need to select the following as a minimum:
- Accessories
- Cabinets
- CXMaterials2
- CxMaterialVendor
- CxPart2
- Job Info
- Parts
- Rooms
- Click Save.
Creating a Test Job with CV and JMSync
- Ensure you have a piece of hardware set up in CV (e.g. a hinge) with an SKU (see example below).
Information & Example:
Generating a bill of materials from Cabinet Vision can be done by yourself, or is supported by Cabinet Vision Australia as Solid Setup Plus: https://www.planitaustralia.com.au/solid-setup-plus
Jobman only requires qty and product codes for importing.
For this to work:
- Product codes must match between Cabinet Vision and Jobman.
- The Job Number in Jobman must match the name of the Cabinet Vision file. This will be referenced by JMSync to send information to the correct place in Jobman.
The product code can be entered in the material SKU field, or after the material description by a # symbol.
Example: Blum Motion 110 Instera#71B3590

Note: You can also enter the product code after the material name field (above the description field) by a # symbol.
- Create a new job in CV that has the same job number as one of your test jobs in Jobman. The job should include a two-door cabinet that contains your example hinge.
- Save all changes to the job in CV.
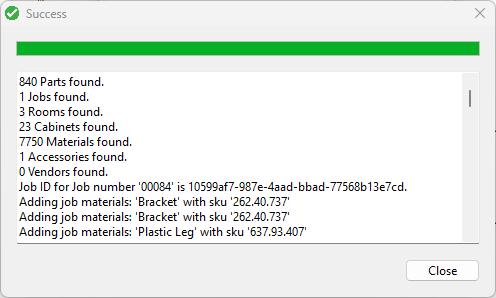
- In CV, navigate to Reports.
- Run any report. (This will populate Cabinet Vision's database with the information that Jobman requires.)
- Run JMSync. (In the main window, click Upload [Report Name].)
-
You should see a Success window pop up:

Troubleshooting
Q. I clicked Load Tables and the program froze.
A. This is caused by an issue with your Connection String. Double-check that the path to the Report.mdb is correct and contains no typos. If it is correct, contact help@jobman.com for further support.
Q. I clicked Load Tables and I'm missing some of the tables to be uploaded required.

A. If you cannot see the CxMaterialVendor table, you will need to enable this by following these steps:
- From the main screen of Cabinet Vision, open any job.
- Navigate to Report Centre.
- Click Set Up Reports.
- In the next screen, go to Material Summary.
- Click the (+) icon, then in the table, select Material Vendor Map.

- Click Save and you will now have created the required buttons to run the profiles.
Example:
When correctly mapped, the tables should show as below.
Select Cabinets/CX Part/Job Info/Parts/CX Material (Highest number)/CX Part/Rooms and then save.

Once the report is uploaded, q "Success" notification will appear, displaying materials and quantities added to the Materials list for that job.
Clicking Upload CV11 Hardware will verify product codes in Cabinet Vision against Jobman, as shown below.
|
|
|


The Materials list will be now populated. If you had this screen already open, you will need to refresh.

What Next?
Populate Job Materials from Cabinet Vision
See Managing Job Resource Materials for more info.
Populate Job Deliverables from Cabinet Vision
See Populating Deliverables with Cabinet Vision and JMSync for more info.
Populate Jobman's Catalogue from Cabinet Vision
This is considered an advanced procedure, and is not supported by Jobman. It can, however, save time creating your Catalogue if done correctly.
You will need some freeware, such as MDB viewer Plus (http://www.alexnolan.net/software/mdb_viewer_plus.htm), and proficiency with Excel.
- Open Cabinet Vision’s Report.MDB with MDB viewer Plus and navigate to the CXMaterialsColumn.
- Export to Excel and change the .txt extension to .csv.
- Open the .csv file and remove the data you do not need, then format the remaining data for importing into Jobman, using the guidelines found here: https://docs.jobmanapp.com/article/167-importing-catalogue-items
Please note:
- Jobman can identify product codes in the report database (for hardware items) in the SKU field in versions 9 and onwards or by placing #(productcode) after the description.


